Have you ever seen some cool videos that are using Linux? Have you ever wondered how those people record their screen in Ubuntu or other Linux distribution? Have you also ever tried to do the same? And has it ever happened that you were unable to find some software to capture your screen as a video?
Well, then look no further. Because, today, I will show you how to record your screen in Ubuntu Linux.
We’ll be using a tool SimpleScreenRecorder for this purpose. It is one of the best screen recorders for Linux and is a free and open source software.
Let’s first see how to install SimpleScreenRecorder in Ubuntu and other Linux distributions based on Ubuntu such as Linux Mint, Linux Lite, Elementary OS etc.
Install SimpleScreenRecorder on Ubuntu

SimpleScreenRecorder is available in Ubuntu Software Center. So, you can install it either via Software Center or by running the following command in terminal:
sudo apt install simplescreenrecorderTo install the latest version of SimpleScreenRecorder in Ubuntu-based Linux distributions, you can also use the official PPA. Use the following commands in the terminal:
sudo add-apt-repository ppa:maarten-baert/simplescreenrecorder
sudo apt update
sudo apt install simplescreenrecorder
Setting up SimpleScreenRecorder to record screen
Once you have installed SimpleScreenRecorder, you might want to configure it to your needs. Let’s see how to do that.
Open up the software by searching for it in system menu.
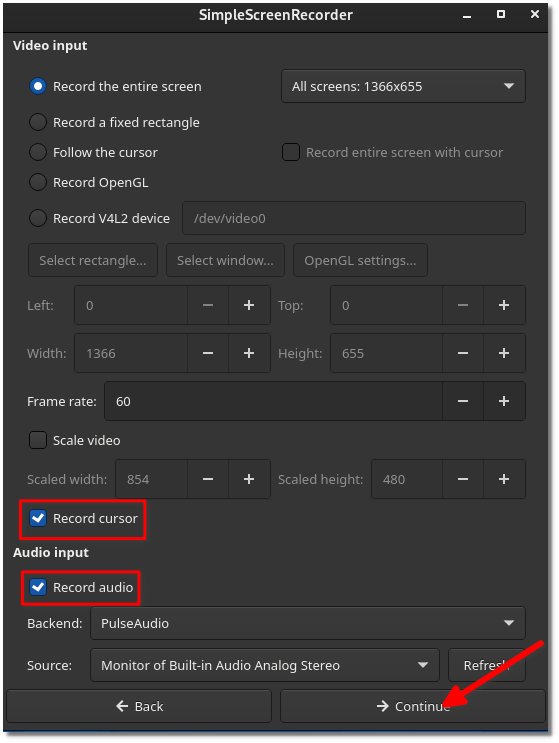
On the next screen, set your options. These include options like video screen size if you want a rectangular region or want to record your cursor or not. Also, here on this screen, set whether you want to record audio or not.
Personally, I’m using a headset in the audio jack of my PC. For that, I use Pulse audio and Built-in Audio Analog Stereo

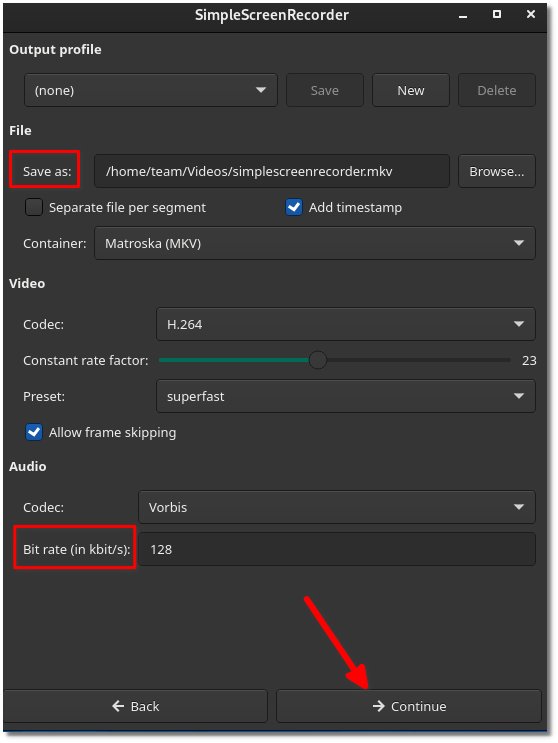
Once satisfied with the settings, click continue. On the next screen, select where you want to save the file and also the bit rate of audio for your video.

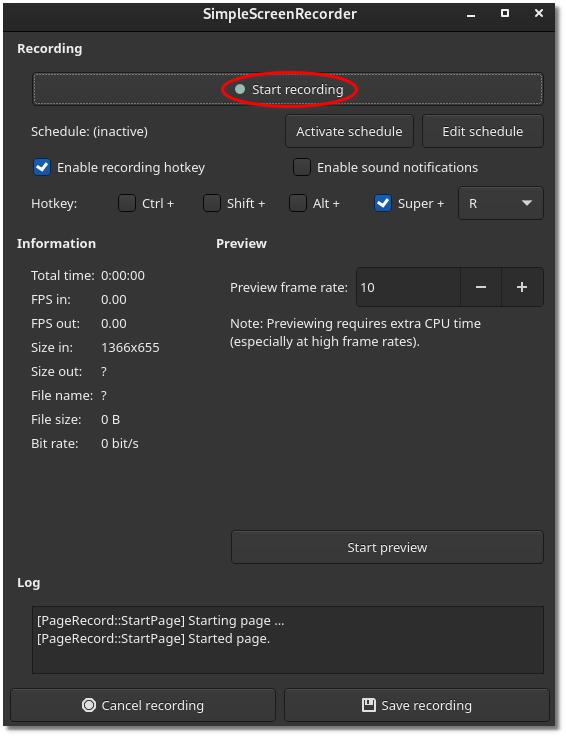
Once the settings are in place, just hit start recording, and it will start recording the screen for you.

When you want it to stop recording, just open up the app and hit stop recording. Your video will be saved in the specified location. That’s it, go and record your screen now!
Controlling the recording with keyboard shortcuts
SimpleScreenRecorder supports several keyboard shortcuts to start and pause recording. This is a handy feature and saves you some editing effort when you don’t want to include all parts of your screen recording.
Hotkey can be selected in the settings page (Ctrl, Shift, Alt, Super) shown above.
In this system, the hotkey is set to super (i.e. Windows key). Super + R will start recording and pressing it again will pause the recording. To finish the recording, pause it first and then click on finish recording from the interface.
Conclusion
SimpleScreenrecorder has been a dependable screen recorder for years. Unfortunately, it doesn’t support the Wayland display server yet and thus it is not as useful on modern, mainstream distros like Fedora etc.
I don’t blame it entirely. There are only a couple of screen recorder that support Wayland. For the legacy X display server, SimpleScreenrecorder simply works. It is the best one I’ve been able to find which also correctly syncs with my audio jack.

