One of the reasons why people use Arch Linux is that it is a bleeding edge rolling release. You get most software and the Linux kernel before users of other distributions.
But this doesn’t mean that you have to always use the latest mainline kernel. There are several kernel options available, and I am going to show you switch kernels in Arch Linux.
Different types of kernels available for Arch Linux
First, let me tell you about different kinds of Linux kernels available to you as an Arch user.

Mainline kernel (package name: linux)
This is the latest stable Linux kernel. Most people use this kernel for the reason that it is the latest available kernel version.
LTS kernel (package name: linux-lts)
The linux-lts package gives you the latest long term support Linux kernel. There is no predefined life cycle for a LTS kernel but you can be assured to enjoy the same kernel version for a much longer period.
Kernel patches normally don’t break anything but a breakage is not impossible to happen. If your hardware isn’t the newest the market can offer, you can enjoy the bleeding edge software with increased stability by installing the slightly older LTS kernel.
Hardened kernel (package name: linux-hardened)
For the security concerned users, there is a hardened version of the latest stable kernel. Do note that several packages will not work when using this kernel.
Performance-tuned kernel (package name: linux-zen)
If you want to get the most out of your system, you can use the “Zen” kernel which is basically a fork from the latest kernel and provides tunes at the cost of throughput and power usage.
How to switch kernels on Arch Linux
Now that you are aware of various kernel choices, let’s see how to change kernel in Arch Linux.
It is a two step process:
- Install the Linux kernel of your choice
- Tweak the grub config file to add the newly installed kernel
Don’t worry, I am going to show you the steps in details.
Check the kernel version in arch Linux using this command:
uname -rIf it shows only a number
To switch kernels on Arch, can be simply done by installing the kernel that you want to use and tweak the grub configuration file.
Step 1: Install the kernel of your choice
You can use the pacman command to install the Linux kernel of your choice. You just need to know the package name.
You may also install more than one type of Linux kernels at the same time in the system. You can choose which kernel to use from the grub menu.
For the latest stable kernel:
sudo pacman -S linuxFor the latest LTS kernel:
sudo pacman -S linux-ltsFor latest stable kernel with hardened patches:
sudo pacman -S linux-hardenedTo get the Zen kernel:
sudo pacman -S linux-zenStep 2: Tweak the grub configuration file to add more kernel options
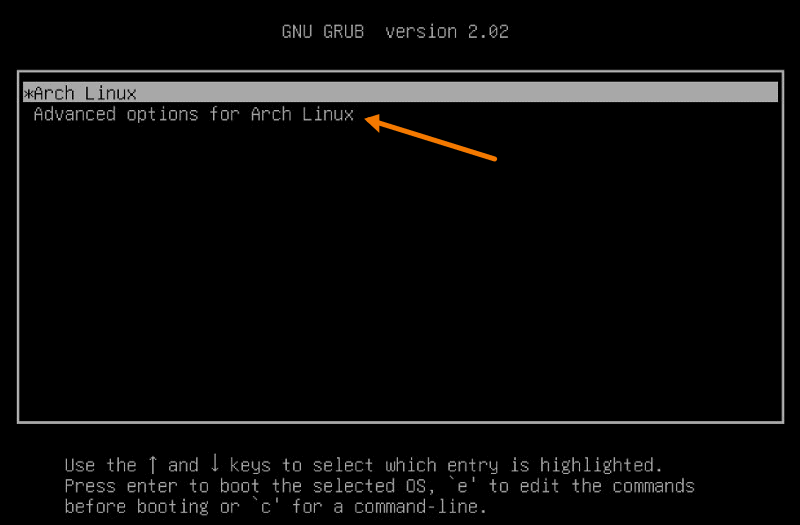
By default, Arch Linux uses the latest kernel version as the default. Additional kernel versions are available from under the advanced options:

However, I prefer to do things a bit different and a bit better (in my opinion). Here’s what I do:
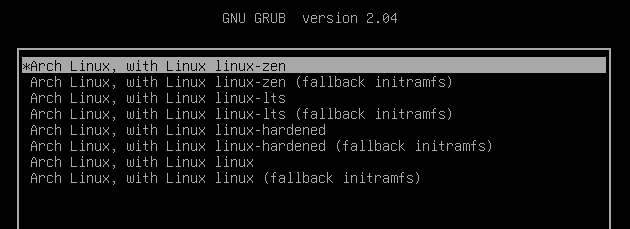
- Disable grub submenu so that all the available kernel versions are shown on the main screen (instead of under Advanced Options).
- Configure grub to recall the last kernel entry you booted and use it as the default entry to boot from the next time.
Sounds a lot better already, does it not?
To do this you need to edit the GRUB configuration file. All the configuration files in general are located at the /etc directory.
Open your terminal and edit the config file in your favorite terminal-based text editor. I am using Nano editor:
sudo nano /etc/default/grub
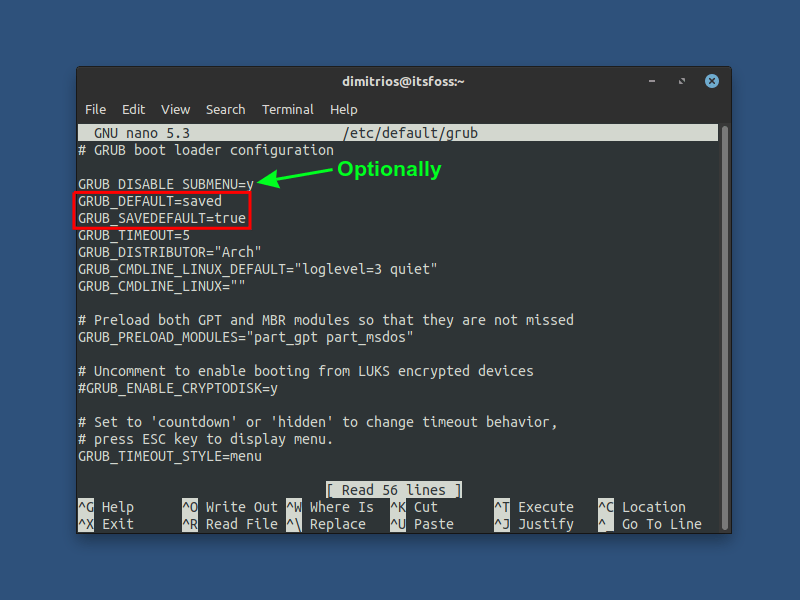
As you may notice I have changed the value that I mentioned but I have added another 2 lines so the final result should look like this:
GRUB_DISABLE_SUBMENU=y
GRUB_DEFAULT=saved
GRUB_SAVEDEFAULT=true
The first and optional line is used to disable the GRUB submenu. I find it easier when instantly I can see all my kernels on the GRUB screen without having to enter the advanced options submenu.
The second line is used to save the last kernel entry.
Lastly you need to ensure that GRUB will use as a default the last saved entry.
Save the configuration file and exit.
Step 3: Re-generate the GRUB configuration file
To make the changes effective you need to re-generate the configuration file. To do so, open the terminal and run the following command:
$ sudo grub-mkconfig -o /boot/grub/grub.cfgIf it looks familiar to you, you have used this command during the Arch Linux installation process.
Reboot your Linux system and select the kernel you want to use!

Conclusion
You don’t need to worry about updating the kernel in Arch Linux. If there are updates to your choice of kernel, it will be installed with the system updates. I guess you already know how to update Arch Linux system.
Switching kernels on Arch Linux is an easy to do process with several options tailored to your needs. I find the above method the safest and easiest as you don’t need to remove a kernel from your system. If you choose to run the latest kernel, it’s good to have installed the LTS kernel in case of a kernel panic.
I hope you liked this Arch Linux tip. Stay subscribed to It’s FOSS for more tips and tutorials.

